Wednesday, November 30, 2011

12 Days of Christmas Savings is Here!

I am so pleased to let you know that DMW Gifts inspired by La Bella baskets is offering its 12 Days of Christmas Savings! Starting tomorrow, December 1st...
Shop and receive..
15% OFF 
purchases of $49.99 or more!

Enter coupon code:  DEC15 at checkout
Just look at some of the gorgeous items that are available:

So lovely & there are so many more items to choose from! Just visit www.dmwgifts.com and get your holiday shopping done all from the comfort of your own home. But don't delay because the 15% off is only in effect for the 1st 12 days of December.  This sales ends 12/12/11 @ 11:59 EST.

Tuesday, November 22, 2011

DMW Gifts

I am so proud to announce that I have expanded my business!  I now offer wonderful gift items at www.dmwgifts.com that are inspired by La Bella Gift Baskets.  Please take a look at my site where you can shop for everything from gift baskets, flowers, candles, care packages, & so much more!  The holidays are right around the corner but it is not too late to take care of some of your gifting needs & to make it even easier, you can get an extra 10% off by entering the coupon code NOV10.  This offer is good until November 30, 2011.  BUT WAIT...enter in the coupon code NOV15 and you can get 15% off good till November 28th!

I really love this opportunity to help with folks gifting needs.  Not only does La Bella offer wonderful items but every month they share the gift of giving by providing a La Bella Basket of Smiles to a single mom.  How great is that!  

So go ahead and check it out & if you have any questions, please do not hesitate to call me at 214-494-1070.

Saturday, November 5, 2011

Kudos to Kissee Home Inspections!!!

I have to give a special shout out to Anita Kissee from Kissee Home Inspections http://www.kisseeinspections.com/.  Knowing that I was trying to get my Tasty Tidbit Treats biz off the ground she was gracious enough to ask me to provide the treats for an event at Keller Williams Realty where she was one of the sponsors. It was a wonderful opportunity to get my name & products out there...thank you Anita!

Kissee Home Inspections color theme is royal blue & gold so I decided to make a few of the treats in that color scheme.  I provided yummy brownie bites in pretty gold candy cups,


delicious cake ball baby bites in devil foods cake & butter cake flavors,


I also did these in royal blue & gold sugar sparkles,


also did some almond meringues that were a big hit.


Also provided a jar of cookies with a $25 gift certificate as a door prize:


All in all the whole display came out better than I had expected & was pleasantly surprised by the reaction of those who tried my goodies, with one woman claiming she was biting into a little piece of heaven...now that was a great compliment :)


Wednesday, October 5, 2011

Booooteeefulll!!!

I had so much fun this past weekend experimenting with some halloween ideas for my cake pops/balls.  I had this idea of making ghost brownie pops & bought a lovely black ceramic loaf pan which I decided to make a small devil's food cake in.  I also baked some sugar cookies, frosted them gray & added words to make them look like tombstones. Here is how it started out:
After I made the brownie pops & let them cool, I then placed them on lollipop sticks w/white chocolate to hold in place & then dipped them in white chocolate. Next...
After the brownie bites dried I made my attempt at drawing some ghost faces.  Unfortunately the edible ink pen I had did not want to work properly so I used black gel instead.  This was tedious so because I'm the mom...I made my daughter finish :)  Thank you Samantha!
Then I made a bunch of devil's food cake loaves.

Next I made some sugar cookies, shaped them like a tombstone & made some gray frosting.
I had the idea that I would make the cake look like a graveyard & have the ghosts hovering over the graves.  Sounded good but.....
The pops just did not want to cooperate.  So time to improvise.
I took out the pop sticks & put the brownie bite ghost on top of the devil food cake grave.  Still came out cute I think, but really would have liked it if it would have come out the way I originally planned.  Oh well all's well that end's well...still think they look Booooteeefulll!!!


Wednesday, September 28, 2011

Take the Cake!

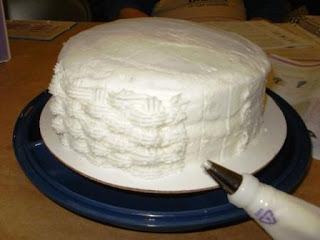
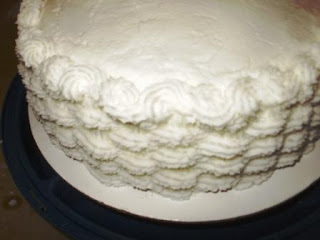
Well I finished my one class last night...WooHoo! For my final project I had to make a cake, do a basket weave on the side & decorate the top with pre-made royal icing flowers.

So here is the 1st step after you've already iced your cake with buttercream icing.  It is a good idea to mark the sides in quarters to set up your posts & rails for your basket weave.
Using your spatula makes the work easy.  Then you continue to mark all around so your basket weave will be even.
The following is the progress of the work:


This last photo shows the shells forward & backward that you put on the top of the basket weave to give it a uniform look.


I didn't know if I would have enough time to finish the basket weave before the end of the class so I went ahead & placed my rosebuds on the top of the cake.


As it turned out I did have the time to finish. I was then going to take the cake home & finish placing flowers & putting a really pretty vine down & around the side but.....


My kids couldn't wait to eat it :)

Thursday, September 22, 2011

A Rose is a Rose....Not Always!

Okay so I have been going to these Wilton classes which, to say the least, have been quite interesting.  I'm learning some time saving tricks which I love but mostly concentrating on design.  It turns out I'm not so great at the whole flower thingy because it seems I have this tendency to "draw" and that is a no-no.  You are supposed to let the icing flow and just guide it....okaaaay, easier said than done.

So here is a sad photo of my 1st attempt at a rose:

Sorry not only for the poor quality of the photo (used my camera phone) but also for the poor quality of this blob of a flower.  My instructor was nice though saying that it wasn't that bad it looks like a "cabbage rose".  Well just like actual cabbage they both stink :p


So since I don't like to quit, here is my 2nd attempt:

Okay getting better but another thing I learned is how important the consistency of the icing should be. Mine for some reason tends to be on the loosey goosey side so my flowers tend to flop.


And last but not least...3 times a charm:

 
Tadah! By George I think she's got it!  Now if I could get my roses to look like this...


Then I would be a very happy camper!!!


Saturday, September 10, 2011

Door Prize

Well thanks to my mother-in-law I was invited to a meet 'n' greet for the United Way.  I utilized the opportunity to introduce my product an offered some Red Velvet Cake Balls as a door prize.  Who knew that this...


(no that is not ground meat ;) Could turn into....


this! And to make a nice presentation I added...


a pretty bow to it :-)

Tasty Tidbit Treats first door prize!

Wednesday, September 7, 2011

ChaChing

Soooo....I went to the class last night & of course I am now also signed up for the other two that they offer.  Yep that is how I roll ; ) While the cost of the classes are very reasonable, $22.50 for 4 two hour classes.  Not bad, BUT that does not include the cost of the items you will NEED to have. 

Now as I have stated before my aim is to produce smaller bite size treats, I think it is good to expand my knowledge & learn the details of decorating a cake. I believe I will be able to adapt most of what I learn into gorgeous cupcakes, beautiful mini cakes & adorable pops!

Kudos & a big thank you goes out to my hubby Tim for giving me


ChaChing...towards my purchase.  What exactly did I purchase you ask???


Yes one Wilton ULTIMATE Decorating Set that comes with:


All of these GOODIES!!!!  A tad bit overwhelming but hey that's what the classes are for. Now as the front of the box states this is a $250 value but Michael's sells this set for....


But thanks to one of these.....


I was able to use my hubby's ChaChing for the purchase.  Did I mention the kudos & big thank you to my hubby?  Love you honey...more!

Now I figure this is all a good investment because I will be utilizing it BUT I am also hoping to use it as a tease to get my sister Dayna to move out to the great state of Texas & join me in my confectionery adventure ; )  Now she is the Master at doing unbelievable cakes....here is an example of her artwork:


Here is her handmade beautiful pink butterfly cake...she added all the extras to really make it pop!


And her adorable truck cake fully equipped with yummy gummies :)

So that is just a snippet of her talent....as you can see I need to get her here so we can make some ChaChing!!!

Tuesday, September 6, 2011

Back to School

Well it's that time of year again when kids are heading back to school & a collective sigh from exhausted parents can be heard from near & far.  I found out that my local Michael's store will be having Wilton Cake Decorating classes...starting tonight!  So since I'm starting a new company & want to provide the best treats possible, I too will be off to school (as it were) to learn some new techniques to add to my goodies. I figure it's never too late to teach an old dog new tricks....
WOOF!
My little guy Joey agrees : )

Monday, September 5, 2011

Making Red Velvet Treats

Okay so my daughter Samantha (my inspiration for all of this) decided to document some of my baking.  So here we go.....

Absolutely love how the red velvet mix looks blood red as it all comes together.

I find it easier to pour into the mini cupcake holders if you first pour the mix into a measuring cup.
Next it's time to pour.......
Yum, looking good already!
Then its time to pop them into the oven
Had extra batter so I decided to do some regular size cupcakes too.
After about 25 minutes cooking @ 350 degrees, the cupcakes are ready to come out of the oven.
Now just need to let them completely cool before decorating.
Here are just a few that I decorated with amore in mind....ooo la la!
    
Okay so there you go, the first sample of some of my baking....bon apetite!